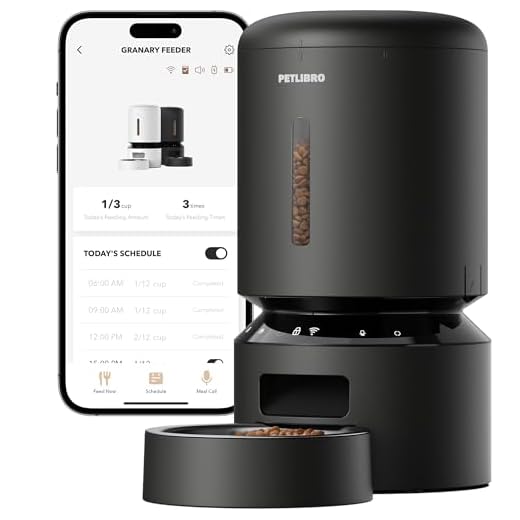


First things first, ensure you have fresh batteries ready. My new dining machine requires them to function properly. Without power, it won’t serve me my meals on schedule.
Next, fill the container with my favorite kibble. Make sure to choose a high-quality brand–my taste buds appreciate the finer things in life. After filling it up, securely attach the lid. This prevents any accidental spills when I’m eagerly waiting for my food.
Now, it’s time to program the meal times. Using the buttons on the device, set specific hours for my meals. I prefer a routine, and I expect you to stick to it. Remember, I thrive on consistency!
Finally, test the setup by scheduling a small portion. Observing whether the machine dispenses food correctly gives me peace of mind. I want to ensure my new feeding companion works flawlessly before relying on it completely.
Setting Up My Food Dispenser
To begin with, ensure the device is plugged into a power source. Use the included adapter for a secure connection. After that, install the backup battery to keep meals on schedule during power outages.
Preparing the Food
Choose a high-quality dry mix that suits my taste. Follow these steps:
- Open the top lid and pour the kibble into the storage compartment.
- Close the lid securely to prevent spills or sneaky snacks.
- Make sure the food level is visible through the clear window.
Programming Meal Times
Access the control panel to set meal times and portions. Here’s how:
- Press the “Menu” button to enter settings.
- Select the desired feeding schedule by choosing the hour and minute.
- Adjust the portion size using the “+” or “-” buttons.
- Confirm each setting by pressing “OK”.
Once you’ve finished, test the functionality by pressing the “Feed Now” option. This ensures everything is working properly, and I’ll get my first meal on time!
Choosing the Right Location for Your Feeder
Position the device in a quiet corner away from heavy foot traffic. Cats appreciate their own space while munching away on their meals. A serene spot allows me to eat without distractions.
Ensure the area is accessible but not too exposed. Consider placing it near where I often hang out, so I can easily find it during meal times. Avoid high-traffic zones like hallways or the living room.
Keep it away from my litter box. The odors from the box can deter me from enjoying my meals. Fresh air is key for an enjoyable dining experience.
Check for power sources. If it requires electricity, make sure there’s an outlet nearby. Long cords can be a tripping hazard, so plan for a neat arrangement.
Lastly, observe the lighting. A well-lit area is preferable, especially if I’m a bit shy. Natural light can help me feel more comfortable while I eat.
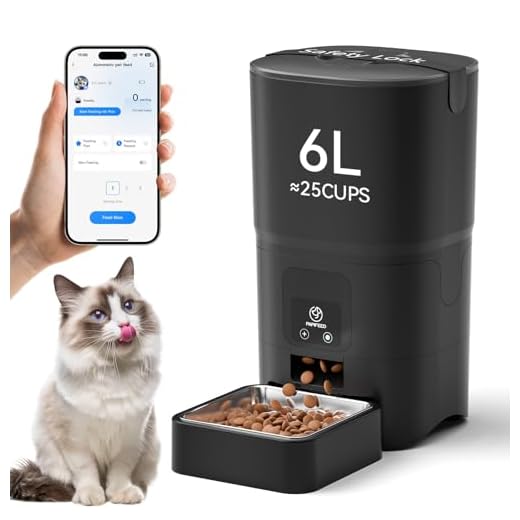
Programming Feeding Times and Portions
To ensure my meals are perfectly timed and portioned, I recommend using the scheduling feature of the device. This allows me to enjoy my food at regular intervals without needing a human to intervene. You can program up to four feeding times each day, which is ideal for keeping my energy levels steady throughout the day.
Start by selecting the feeding schedule. Each feeding time can be set to a specific hour and minute. For instance, I prefer my breakfast around 8 AM, lunch at 1 PM, and dinner at 7 PM. The evening snack is set for 10 PM, just before my bedtime. This routine keeps me satisfied and prevents any late-night cravings!
Next, adjust the portion size for each meal. The device allows you to dispense anywhere from 1/8 cup to 1 cup of food per serving. If you’re unsure about how much to serve, consult your veterinarian or check resources like what antibiotics are safe for cats for dietary guidance. For me, I find that 1/3 cup per meal works perfectly.
| Feeding Time | Portion Size |
|---|---|
| Breakfast | 1/3 cup |
| Lunch | 1/3 cup |
| Dinner | 1/3 cup |
| Evening Snack | 1/4 cup |
By programming these times and portion sizes, I can confidently enjoy my meals while my human can focus on other activities. This setup not only reduces their workload but also helps me maintain a healthy diet. If you have a larger breed, consider researching suitable feeding options, similar to finding the best clippers for maine coon cats. Happy feeding!
Maintaining and Cleaning Your Feeder
Regular upkeep is key to ensuring my meal dispenser functions properly. Start by unplugging the device before any cleaning activities. This prevents accidental dispensing while you work.
For routine maintenance, I recommend cleaning the food bowl and the hopper at least once a week. Use warm soapy water and a soft cloth to wipe down the surfaces. Avoid abrasive materials that could scratch the finish. Rinse thoroughly to remove any soap residue before reassembling.
Dealing with Stuck Food
If you notice any leftover kibble or moisture in the bowl, it’s best to address it immediately. A damp cloth can help remove stubborn bits without damaging the equipment. For deeper cleaning, consider using a small brush to get into hard-to-reach areas.
Checking the Mechanisms
Periodically inspect the internal mechanisms for any signs of wear or blockages. Ensure the dispensing unit moves freely and isn’t obstructed by food particles. If you find any issues, consult the manual for troubleshooting tips or consider reaching out to customer support.
First things first, ensure you have fresh batteries ready. My new dining machine requires them to function properly. Without power, it won’t serve me my meals on schedule.
Next, fill the container with my favorite kibble. Make sure to choose a high-quality brand–my taste buds appreciate the finer things in life. After filling it up, securely attach the lid. This prevents any accidental spills when I’m eagerly waiting for my food.
Now, it’s time to program the meal times. Using the buttons on the device, set specific hours for my meals. I prefer a routine, and I expect you to stick to it. Remember, I thrive on consistency!
Finally, test the setup by scheduling a small portion. Observing whether the machine dispenses food correctly gives me peace of mind. I want to ensure my new feeding companion works flawlessly before relying on it completely.
Setting Up My Food Dispenser
To begin with, ensure the device is plugged into a power source. Use the included adapter for a secure connection. After that, install the backup battery to keep meals on schedule during power outages.
Preparing the Food
Choose a high-quality dry mix that suits my taste. Follow these steps:
- Open the top lid and pour the kibble into the storage compartment.
- Close the lid securely to prevent spills or sneaky snacks.
- Make sure the food level is visible through the clear window.
Programming Meal Times
Access the control panel to set meal times and portions. Here’s how:
- Press the “Menu” button to enter settings.
- Select the desired feeding schedule by choosing the hour and minute.
- Adjust the portion size using the “+” or “-” buttons.
- Confirm each setting by pressing “OK”.
Once you’ve finished, test the functionality by pressing the “Feed Now” option. This ensures everything is working properly, and I’ll get my first meal on time!
Choosing the Right Location for Your Feeder
Position the device in a quiet corner away from heavy foot traffic. Cats appreciate their own space while munching away on their meals. A serene spot allows me to eat without distractions.
Ensure the area is accessible but not too exposed. Consider placing it near where I often hang out, so I can easily find it during meal times. Avoid high-traffic zones like hallways or the living room.
Keep it away from my litter box. The odors from the box can deter me from enjoying my meals. Fresh air is key for an enjoyable dining experience.
Check for power sources. If it requires electricity, make sure there’s an outlet nearby. Long cords can be a tripping hazard, so plan for a neat arrangement.
Lastly, observe the lighting. A well-lit area is preferable, especially if I’m a bit shy. Natural light can help me feel more comfortable while I eat.
Programming Feeding Times and Portions
To ensure my meals are perfectly timed and portioned, I recommend using the scheduling feature of the device. This allows me to enjoy my food at regular intervals without needing a human to intervene. You can program up to four feeding times each day, which is ideal for keeping my energy levels steady throughout the day.
Start by selecting the feeding schedule. Each feeding time can be set to a specific hour and minute. For instance, I prefer my breakfast around 8 AM, lunch at 1 PM, and dinner at 7 PM. The evening snack is set for 10 PM, just before my bedtime. This routine keeps me satisfied and prevents any late-night cravings!
Next, adjust the portion size for each meal. The device allows you to dispense anywhere from 1/8 cup to 1 cup of food per serving. If you’re unsure about how much to serve, consult your veterinarian or check resources like what antibiotics are safe for cats for dietary guidance. For me, I find that 1/3 cup per meal works perfectly.
| Feeding Time | Portion Size |
|---|---|
| Breakfast | 1/3 cup |
| Lunch | 1/3 cup |
| Dinner | 1/3 cup |
| Evening Snack | 1/4 cup |
By programming these times and portion sizes, I can confidently enjoy my meals while my human can focus on other activities. This setup not only reduces their workload but also helps me maintain a healthy diet. If you have a larger breed, consider researching suitable feeding options, similar to finding the best clippers for maine coon cats. Happy feeding!
Maintaining and Cleaning Your Feeder
Regular upkeep is key to ensuring my meal dispenser functions properly. Start by unplugging the device before any cleaning activities. This prevents accidental dispensing while you work.
For routine maintenance, I recommend cleaning the food bowl and the hopper at least once a week. Use warm soapy water and a soft cloth to wipe down the surfaces. Avoid abrasive materials that could scratch the finish. Rinse thoroughly to remove any soap residue before reassembling.
Dealing with Stuck Food
If you notice any leftover kibble or moisture in the bowl, it’s best to address it immediately. A damp cloth can help remove stubborn bits without damaging the equipment. For deeper cleaning, consider using a small brush to get into hard-to-reach areas.
Checking the Mechanisms
Periodically inspect the internal mechanisms for any signs of wear or blockages. Ensure the dispensing unit moves freely and isn’t obstructed by food particles. If you find any issues, consult the manual for troubleshooting tips or consider reaching out to customer support.