


Begin by laying the fish on a clean, flat surface. Use a sharp knife to make an incision behind the gills, cutting down toward the backbone. Ensure your blade is sharp for clean cuts, which makes the process smoother.
With the initial cut made, carefully glide the knife along the backbone towards the tail. Keep the blade as close to the bones as possible to maximize the meat obtained. Use a gentle sawing motion, applying even pressure to avoid tearing the flesh.
Once you reach the tail, you can sever the fillet from the body. Flip the fish over and repeat the same technique on the other side. It’s important to maintain control of the knife and work methodically to ensure both sides are equally prepared.

After separating the fillets, remove any remaining bones using tweezers. Rinse the meat under cold water and pat dry with paper towels. This step enhances the flavor and texture of your meal. Now, you’re ready to cook or store your freshly prepared fish!
Filleting a Fish
For the best results, ensure your knife is sharp and flexible. This helps in making clean cuts, which is crucial for preserving the meat’s quality.
Place the fish on a clean, flat surface. Make sure it’s steady to avoid any slips. A cutting board works well, but a clean countertop is fine too.
Begin by making an incision behind the gills, angling the knife towards the backbone. Apply gentle pressure as you cut through the flesh. Draw the knife along the spine towards the tail, keeping the blade close to the bones to maximize the amount of meat.
Once you reach the tail, turn the fish over and repeat the process on the other side. Use your fingers to hold the fillet down while cutting away from the body.
After removing both sides, you’ll notice some pin bones. Use tweezers to extract these; they can be unpleasant to bite into.
Now, it’s time to remove the skin. Place the fillet skin-side down. Start at the tail end, inserting the knife between the skin and the flesh. Hold the skin tightly and pull while slicing through to separate the two.
Once you have your clean fillets, rinse them in cold water and pat dry with a paper towel. This step ensures they’re ready for cooking or storage.
| Step | Details |
|---|---|
| 1 | Sharpen your knife. |
| 2 | Place fish on a steady surface. |
| 3 | Make an incision behind the gills. |
| 4 | Cut along the spine to the tail. |
| 5 | Remove pin bones with tweezers. |
| 6 | Separate skin from fillet. |
| 7 | Rinse and dry fillets. |
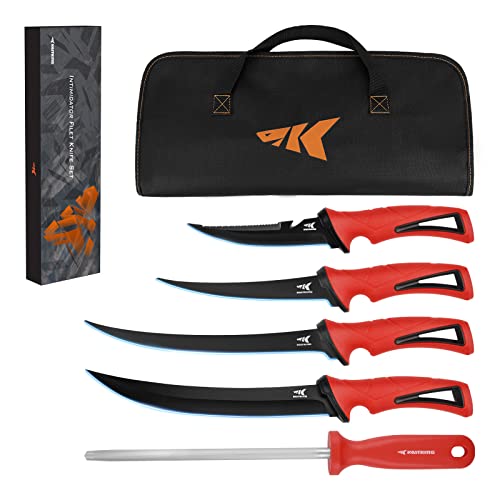
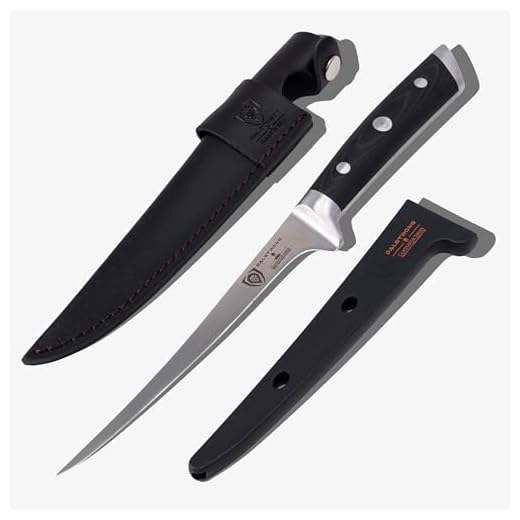
Choosing the Right Tools for Filleting
For precise and clean cuts, a flexible fillet knife is a must-have. Look for one with a blade length between 6 to 9 inches, which allows for better maneuverability around the bones. A sharp blade enhances efficiency, so keep a honing rod handy for touch-ups.
Cutting Board Selection
A non-slip cutting board provides stability during the process. Choosing a board made from plastic or bamboo is ideal, as they are easy to clean and won’t dull your knife. Ensure it’s large enough to accommodate the size of your catch.
Additional Essentials
Gloves can help maintain grip and hygiene. Opt for cut-resistant gloves to protect your hands while handling sharp tools. A pair of pliers is useful for removing any remaining bones, ensuring a smooth experience.
Lastly, a fish scaler can aid in removing scales quickly, reducing prep time. These tools, combined with careful technique, make for a successful preparation session.
Step-by-Step Guide to Making the First Cut
Position the fish on a clean, stable surface. Ensure it’s lying on its side, with the dorsal fin facing away from you. Grip the head firmly, using your non-dominant hand to stabilize it.
With your dominant hand, take your sharp knife and insert the blade behind the gills, angling it towards the spine. Apply gentle pressure to puncture the skin. Make a clean cut, following the contour of the head, until you reach the backbone.
Slice through the flesh, feeling for the bones as you cut. This initial incision is crucial for accessing the meat efficiently. Be mindful of your grip and maintain control over the knife to avoid any slips.
Once the first cut is complete, you’ll have a clear path to continue the filleting process. Remember, precision is key for the best results. For additional health tips regarding pet care, check out can you give a cat laxatives.
Removing the Skin and Bones Properly
For a clean removal of the skin, grasp the tail securely and make a shallow cut along the back. With your knife, carefully slide underneath the skin, lifting it away from the flesh. Use steady, gentle motions to avoid tearing. Pull the skin back while moving the knife along the body, ensuring the meat remains intact.
After skinning, focus on bone removal. Locate the spine and use your knife to slice along both sides. This helps separate the meat from the backbone. Gently pull the meat away while cutting to ensure no small bones are left behind. Pay attention to the rib cage area, as it can contain thin bones. Using your fingers, feel for any remaining bones and remove them carefully to guarantee a smooth eating experience.
Always keep your knife sharp for precision. A dull blade can lead to accidents or uneven cuts. Regularly clean your working area to maintain hygiene and prevent contamination. Disposing of the skin and bones properly contributes to a respectful cooking process.
Storing and Preparing Fillets for Cooking
Keep the fillets fresh by refrigerating them immediately after cutting. Store in an airtight container or wrap tightly in plastic wrap to prevent exposure to air, which can lead to spoilage.
Recommended Storage Duration
- Fresh fillets can be refrigerated for up to 2 days.
- For longer preservation, freeze the fillets. They can last up to 6 months in the freezer.
Before cooking, thaw frozen pieces in the refrigerator for several hours or overnight. Avoid using hot water or microwaving, as these methods can compromise the texture and flavor.
Preparing Fillets for Cooking
- Rinse the fillets under cold water to remove any residual blood or scales.
- Pat dry with paper towels to ensure a good sear when cooking.
- Season to taste with your favorite spices or marinades before cooking to enhance flavor.
If you notice any unwanted odors during storage, check out this guide on how to remove cat smell from home to maintain a fresh kitchen environment.
Video:
Begin by laying the fish on a clean, flat surface. Use a sharp knife to make an incision behind the gills, cutting down toward the backbone. Ensure your blade is sharp for clean cuts, which makes the process smoother.
With the initial cut made, carefully glide the knife along the backbone towards the tail. Keep the blade as close to the bones as possible to maximize the meat obtained. Use a gentle sawing motion, applying even pressure to avoid tearing the flesh.

Once you reach the tail, you can sever the fillet from the body. Flip the fish over and repeat the same technique on the other side. It’s important to maintain control of the knife and work methodically to ensure both sides are equally prepared.
After separating the fillets, remove any remaining bones using tweezers. Rinse the meat under cold water and pat dry with paper towels. This step enhances the flavor and texture of your meal. Now, you’re ready to cook or store your freshly prepared fish!
Filleting a Fish
For the best results, ensure your knife is sharp and flexible. This helps in making clean cuts, which is crucial for preserving the meat’s quality.
Place the fish on a clean, flat surface. Make sure it’s steady to avoid any slips. A cutting board works well, but a clean countertop is fine too.
Begin by making an incision behind the gills, angling the knife towards the backbone. Apply gentle pressure as you cut through the flesh. Draw the knife along the spine towards the tail, keeping the blade close to the bones to maximize the amount of meat.
Once you reach the tail, turn the fish over and repeat the process on the other side. Use your fingers to hold the fillet down while cutting away from the body.
After removing both sides, you’ll notice some pin bones. Use tweezers to extract these; they can be unpleasant to bite into.
Now, it’s time to remove the skin. Place the fillet skin-side down. Start at the tail end, inserting the knife between the skin and the flesh. Hold the skin tightly and pull while slicing through to separate the two.
Once you have your clean fillets, rinse them in cold water and pat dry with a paper towel. This step ensures they’re ready for cooking or storage.
| Step | Details |
|---|---|
| 1 | Sharpen your knife. |
| 2 | Place fish on a steady surface. |
| 3 | Make an incision behind the gills. |
| 4 | Cut along the spine to the tail. |
| 5 | Remove pin bones with tweezers. |
| 6 | Separate skin from fillet. |
| 7 | Rinse and dry fillets. |
Choosing the Right Tools for Filleting
For precise and clean cuts, a flexible fillet knife is a must-have. Look for one with a blade length between 6 to 9 inches, which allows for better maneuverability around the bones. A sharp blade enhances efficiency, so keep a honing rod handy for touch-ups.
Cutting Board Selection
A non-slip cutting board provides stability during the process. Choosing a board made from plastic or bamboo is ideal, as they are easy to clean and won’t dull your knife. Ensure it’s large enough to accommodate the size of your catch.
Additional Essentials
Gloves can help maintain grip and hygiene. Opt for cut-resistant gloves to protect your hands while handling sharp tools. A pair of pliers is useful for removing any remaining bones, ensuring a smooth experience.
Lastly, a fish scaler can aid in removing scales quickly, reducing prep time. These tools, combined with careful technique, make for a successful preparation session.
Step-by-Step Guide to Making the First Cut
Position the fish on a clean, stable surface. Ensure it’s lying on its side, with the dorsal fin facing away from you. Grip the head firmly, using your non-dominant hand to stabilize it.
With your dominant hand, take your sharp knife and insert the blade behind the gills, angling it towards the spine. Apply gentle pressure to puncture the skin. Make a clean cut, following the contour of the head, until you reach the backbone.
Slice through the flesh, feeling for the bones as you cut. This initial incision is crucial for accessing the meat efficiently. Be mindful of your grip and maintain control over the knife to avoid any slips.
Once the first cut is complete, you’ll have a clear path to continue the filleting process. Remember, precision is key for the best results. For additional health tips regarding pet care, check out can you give a cat laxatives.
Removing the Skin and Bones Properly
For a clean removal of the skin, grasp the tail securely and make a shallow cut along the back. With your knife, carefully slide underneath the skin, lifting it away from the flesh. Use steady, gentle motions to avoid tearing. Pull the skin back while moving the knife along the body, ensuring the meat remains intact.
After skinning, focus on bone removal. Locate the spine and use your knife to slice along both sides. This helps separate the meat from the backbone. Gently pull the meat away while cutting to ensure no small bones are left behind. Pay attention to the rib cage area, as it can contain thin bones. Using your fingers, feel for any remaining bones and remove them carefully to guarantee a smooth eating experience.
Always keep your knife sharp for precision. A dull blade can lead to accidents or uneven cuts. Regularly clean your working area to maintain hygiene and prevent contamination. Disposing of the skin and bones properly contributes to a respectful cooking process.
Storing and Preparing Fillets for Cooking
Keep the fillets fresh by refrigerating them immediately after cutting. Store in an airtight container or wrap tightly in plastic wrap to prevent exposure to air, which can lead to spoilage.
Recommended Storage Duration
- Fresh fillets can be refrigerated for up to 2 days.
- For longer preservation, freeze the fillets. They can last up to 6 months in the freezer.
Before cooking, thaw frozen pieces in the refrigerator for several hours or overnight. Avoid using hot water or microwaving, as these methods can compromise the texture and flavor.
Preparing Fillets for Cooking
- Rinse the fillets under cold water to remove any residual blood or scales.
- Pat dry with paper towels to ensure a good sear when cooking.
- Season to taste with your favorite spices or marinades before cooking to enhance flavor.
If you notice any unwanted odors during storage, check out this guide on how to remove cat smell from home to maintain a fresh kitchen environment.
Video:
Begin by laying the fish on a clean, flat surface. Use a sharp knife to make an incision behind the gills, cutting down toward the backbone. Ensure your blade is sharp for clean cuts, which makes the process smoother.
With the initial cut made, carefully glide the knife along the backbone towards the tail. Keep the blade as close to the bones as possible to maximize the meat obtained. Use a gentle sawing motion, applying even pressure to avoid tearing the flesh.
Once you reach the tail, you can sever the fillet from the body. Flip the fish over and repeat the same technique on the other side. It’s important to maintain control of the knife and work methodically to ensure both sides are equally prepared.
After separating the fillets, remove any remaining bones using tweezers. Rinse the meat under cold water and pat dry with paper towels. This step enhances the flavor and texture of your meal. Now, you’re ready to cook or store your freshly prepared fish!
Filleting a Fish
For the best results, ensure your knife is sharp and flexible. This helps in making clean cuts, which is crucial for preserving the meat’s quality.
Place the fish on a clean, flat surface. Make sure it’s steady to avoid any slips. A cutting board works well, but a clean countertop is fine too.
Begin by making an incision behind the gills, angling the knife towards the backbone. Apply gentle pressure as you cut through the flesh. Draw the knife along the spine towards the tail, keeping the blade close to the bones to maximize the amount of meat.
Once you reach the tail, turn the fish over and repeat the process on the other side. Use your fingers to hold the fillet down while cutting away from the body.
After removing both sides, you’ll notice some pin bones. Use tweezers to extract these; they can be unpleasant to bite into.
Now, it’s time to remove the skin. Place the fillet skin-side down. Start at the tail end, inserting the knife between the skin and the flesh. Hold the skin tightly and pull while slicing through to separate the two.
Once you have your clean fillets, rinse them in cold water and pat dry with a paper towel. This step ensures they’re ready for cooking or storage.
| Step | Details |
|---|---|
| 1 | Sharpen your knife. |
| 2 | Place fish on a steady surface. |
| 3 | Make an incision behind the gills. |
| 4 | Cut along the spine to the tail. |
| 5 | Remove pin bones with tweezers. |
| 6 | Separate skin from fillet. |
| 7 | Rinse and dry fillets. |
Choosing the Right Tools for Filleting
For precise and clean cuts, a flexible fillet knife is a must-have. Look for one with a blade length between 6 to 9 inches, which allows for better maneuverability around the bones. A sharp blade enhances efficiency, so keep a honing rod handy for touch-ups.
Cutting Board Selection
A non-slip cutting board provides stability during the process. Choosing a board made from plastic or bamboo is ideal, as they are easy to clean and won’t dull your knife. Ensure it’s large enough to accommodate the size of your catch.
Additional Essentials
Gloves can help maintain grip and hygiene. Opt for cut-resistant gloves to protect your hands while handling sharp tools. A pair of pliers is useful for removing any remaining bones, ensuring a smooth experience.
Lastly, a fish scaler can aid in removing scales quickly, reducing prep time. These tools, combined with careful technique, make for a successful preparation session.
Step-by-Step Guide to Making the First Cut
Position the fish on a clean, stable surface. Ensure it’s lying on its side, with the dorsal fin facing away from you. Grip the head firmly, using your non-dominant hand to stabilize it.
With your dominant hand, take your sharp knife and insert the blade behind the gills, angling it towards the spine. Apply gentle pressure to puncture the skin. Make a clean cut, following the contour of the head, until you reach the backbone.
Slice through the flesh, feeling for the bones as you cut. This initial incision is crucial for accessing the meat efficiently. Be mindful of your grip and maintain control over the knife to avoid any slips.
Once the first cut is complete, you’ll have a clear path to continue the filleting process. Remember, precision is key for the best results. For additional health tips regarding pet care, check out can you give a cat laxatives.
Removing the Skin and Bones Properly
For a clean removal of the skin, grasp the tail securely and make a shallow cut along the back. With your knife, carefully slide underneath the skin, lifting it away from the flesh. Use steady, gentle motions to avoid tearing. Pull the skin back while moving the knife along the body, ensuring the meat remains intact.
After skinning, focus on bone removal. Locate the spine and use your knife to slice along both sides. This helps separate the meat from the backbone. Gently pull the meat away while cutting to ensure no small bones are left behind. Pay attention to the rib cage area, as it can contain thin bones. Using your fingers, feel for any remaining bones and remove them carefully to guarantee a smooth eating experience.
Always keep your knife sharp for precision. A dull blade can lead to accidents or uneven cuts. Regularly clean your working area to maintain hygiene and prevent contamination. Disposing of the skin and bones properly contributes to a respectful cooking process.
Storing and Preparing Fillets for Cooking
Keep the fillets fresh by refrigerating them immediately after cutting. Store in an airtight container or wrap tightly in plastic wrap to prevent exposure to air, which can lead to spoilage.
Recommended Storage Duration
- Fresh fillets can be refrigerated for up to 2 days.
- For longer preservation, freeze the fillets. They can last up to 6 months in the freezer.
Before cooking, thaw frozen pieces in the refrigerator for several hours or overnight. Avoid using hot water or microwaving, as these methods can compromise the texture and flavor.
Preparing Fillets for Cooking
- Rinse the fillets under cold water to remove any residual blood or scales.
- Pat dry with paper towels to ensure a good sear when cooking.
- Season to taste with your favorite spices or marinades before cooking to enhance flavor.
If you notice any unwanted odors during storage, check out this guide on how to remove cat smell from home to maintain a fresh kitchen environment.


