


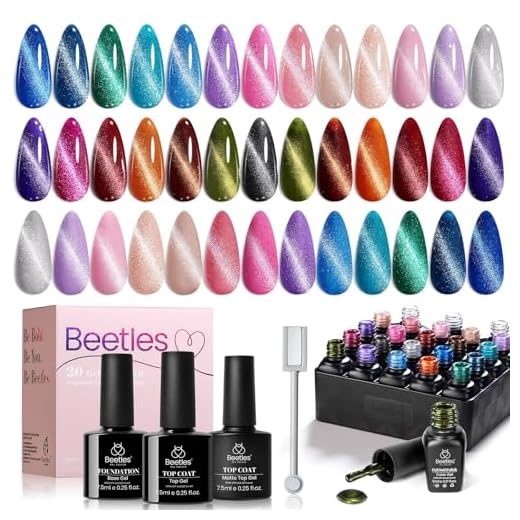


First, ensure your surface is clean and dry. A well-prepared canvas will yield the best results. Apply a base coat to protect your nails, allowing it to dry completely before moving on.
Next, grab the special lacquer with magnetic properties. Apply a generous layer, making sure to cover every part of the nail. This is where the magic begins, so don’t hold back!
Now comes the exciting part. While the polish is still wet, quickly bring your tool close to the nail. Hold it just above the lacquer–about 1 to 2 millimeters away. This distance is crucial for achieving the desired effect. Wait for about 10 to 15 seconds to let the pattern form before curing the polish under a UV lamp.

Once cured, finish with a top coat to seal the design and add shine. This step not only enhances the look but also ensures durability, keeping your claws fabulous for longer!
Finally, admire your work! The unique patterns created by the magnet will have everyone asking how you achieved such a stunning look. You’ll be the talk of the town, and I can guarantee that your friends will be impressed!
Application Technique for Magnetic Nail Coating
Position the tool above the coated surface, maintaining a distance of about 1-2 millimeters. Hold it steady for 10-15 seconds. This allows the shimmering particles to align and create that mesmerizing effect. Ensure that the nail is fully cured before this step for the best outcome.
Final Touches
After achieving the desired look, seal everything with a top coat. This not only enhances the brilliance but also extends the durability of the finish. Make sure to cap the free edge for added protection. Allow sufficient time for drying to preserve the stunning design you’ve created.
Choosing the Right Magnet for Your Polish
Selecting the ideal tool can significantly impact the outcome of your manicure. Here are some specific options to consider:
- Flat Magnets: These are excellent for achieving a subtle, linear effect. The flat surface allows for even distribution of the metallic particles in the lacquer.
- Wave Magnets: Perfect for creating a swirling design. This type adds depth and dimension to your nails, giving a unique look.
- Circular Magnets: Useful for a more concentrated and bold appearance. The round shape can create a striking cat-eye effect when held at the right angle.
- Custom Magnets: Consider investing in specialized tools that come with unique patterns. These can introduce creativity and personal flair to your style.
Experimenting with different types will help you understand what works best for your desired look. Always remember to check the strength of the magnet; stronger options yield more pronounced effects.
Before starting, ensure the polish is applied evenly and has the right consistency. A thicker consistency often yields better results with magnet interaction.
Finally, practice makes perfect! Don’t hesitate to try various techniques to find the style that suits you best.
Step-by-Step Application Process for Cat Eye Effect
To achieve that mesmerizing feline-inspired finish, follow these precise steps. Begin with a clean surface; ensure nails are prepped and polished with a base coat. This prevents staining and promotes adherence.
Layering the Color
Apply the chosen shade evenly, allowing it to dry partially. A thin coat is ideal, as it provides a better reaction with the subsequent steps.
Creating the Cat Eye Look
Once the initial layer is somewhat dry, position the tool above the nail, about 1-2 centimeters away. Hold it steady for approximately 10-15 seconds. The magnetic particles will shift, creating that captivating optical illusion. Afterward, finish with a top coat to seal the design and enhance its shine.
During this process, ensure that all tools are sanitized, and if you’re curious about your feline’s diet, check out if can cats eat cranberry sauce. Also, be mindful of the storage practices for your kitty’s meals; find out whether does canned cat food have to be refrigerated after opening.
FAQ:
What is the process of using a magnet for cat eye polish?
Using a magnet for cat eye polish involves a few key steps. First, apply a base coat and let it dry completely. Then, apply a layer of cat eye gel polish and cure it under a UV or LED lamp. After that, take the magnet and hold it close to the nail (but not touching) for about 10-15 seconds. This will cause the metallic particles in the polish to move and create the desired cat eye effect. Finally, cure the nail again and apply a top coat to seal the design.
Can I use any type of magnet for cat eye polish?
Not all magnets are suitable for cat eye polish. The best results are achieved with specialized magnets designed for nail art. These magnets usually have specific shapes, such as stripes or circles, to create different effects. However, some people have experimented with household magnets, but the results may vary. For the best outcomes, it’s recommended to use magnets made explicitly for cat eye gel polish.
How long does the cat eye effect last on nails?
The longevity of the cat eye effect on nails depends on several factors, including the quality of the polish used, the application technique, and the wear and tear on the nails. Generally, if applied correctly and topped with a good quality top coat, the cat eye effect can last anywhere from one to three weeks. To extend its wear, it’s advisable to avoid harsh chemicals and wear gloves when doing chores.
Can I achieve the cat eye effect with regular nail polish?
Regular nail polish typically does not contain the magnetic particles needed to create the cat eye effect. However, there are some special magnetic nail polishes available that can mimic the cat eye look without the need for gel application. If you want the traditional cat eye effect, using a gel polish with a magnet is the most effective method. If you prefer a simpler approach, look for magnetic nail polishes designed for that purpose.
Video:
First, ensure your surface is clean and dry. A well-prepared canvas will yield the best results. Apply a base coat to protect your nails, allowing it to dry completely before moving on.
Next, grab the special lacquer with magnetic properties. Apply a generous layer, making sure to cover every part of the nail. This is where the magic begins, so don’t hold back!
Now comes the exciting part. While the polish is still wet, quickly bring your tool close to the nail. Hold it just above the lacquer–about 1 to 2 millimeters away. This distance is crucial for achieving the desired effect. Wait for about 10 to 15 seconds to let the pattern form before curing the polish under a UV lamp.
Once cured, finish with a top coat to seal the design and add shine. This step not only enhances the look but also ensures durability, keeping your claws fabulous for longer!
Finally, admire your work! The unique patterns created by the magnet will have everyone asking how you achieved such a stunning look. You’ll be the talk of the town, and I can guarantee that your friends will be impressed!
Application Technique for Magnetic Nail Coating
Position the tool above the coated surface, maintaining a distance of about 1-2 millimeters. Hold it steady for 10-15 seconds. This allows the shimmering particles to align and create that mesmerizing effect. Ensure that the nail is fully cured before this step for the best outcome.
Final Touches
After achieving the desired look, seal everything with a top coat. This not only enhances the brilliance but also extends the durability of the finish. Make sure to cap the free edge for added protection. Allow sufficient time for drying to preserve the stunning design you’ve created.

Choosing the Right Magnet for Your Polish
Selecting the ideal tool can significantly impact the outcome of your manicure. Here are some specific options to consider:
- Flat Magnets: These are excellent for achieving a subtle, linear effect. The flat surface allows for even distribution of the metallic particles in the lacquer.
- Wave Magnets: Perfect for creating a swirling design. This type adds depth and dimension to your nails, giving a unique look.
- Circular Magnets: Useful for a more concentrated and bold appearance. The round shape can create a striking cat-eye effect when held at the right angle.
- Custom Magnets: Consider investing in specialized tools that come with unique patterns. These can introduce creativity and personal flair to your style.
Experimenting with different types will help you understand what works best for your desired look. Always remember to check the strength of the magnet; stronger options yield more pronounced effects.
Before starting, ensure the polish is applied evenly and has the right consistency. A thicker consistency often yields better results with magnet interaction.
Finally, practice makes perfect! Don’t hesitate to try various techniques to find the style that suits you best.
Step-by-Step Application Process for Cat Eye Effect
To achieve that mesmerizing feline-inspired finish, follow these precise steps. Begin with a clean surface; ensure nails are prepped and polished with a base coat. This prevents staining and promotes adherence.
Layering the Color
Apply the chosen shade evenly, allowing it to dry partially. A thin coat is ideal, as it provides a better reaction with the subsequent steps.
Creating the Cat Eye Look
Once the initial layer is somewhat dry, position the tool above the nail, about 1-2 centimeters away. Hold it steady for approximately 10-15 seconds. The magnetic particles will shift, creating that captivating optical illusion. Afterward, finish with a top coat to seal the design and enhance its shine.
During this process, ensure that all tools are sanitized, and if you’re curious about your feline’s diet, check out if can cats eat cranberry sauce. Also, be mindful of the storage practices for your kitty’s meals; find out whether does canned cat food have to be refrigerated after opening.
FAQ:
What is the process of using a magnet for cat eye polish?
Using a magnet for cat eye polish involves a few key steps. First, apply a base coat and let it dry completely. Then, apply a layer of cat eye gel polish and cure it under a UV or LED lamp. After that, take the magnet and hold it close to the nail (but not touching) for about 10-15 seconds. This will cause the metallic particles in the polish to move and create the desired cat eye effect. Finally, cure the nail again and apply a top coat to seal the design.
Can I use any type of magnet for cat eye polish?
Not all magnets are suitable for cat eye polish. The best results are achieved with specialized magnets designed for nail art. These magnets usually have specific shapes, such as stripes or circles, to create different effects. However, some people have experimented with household magnets, but the results may vary. For the best outcomes, it’s recommended to use magnets made explicitly for cat eye gel polish.

How long does the cat eye effect last on nails?
The longevity of the cat eye effect on nails depends on several factors, including the quality of the polish used, the application technique, and the wear and tear on the nails. Generally, if applied correctly and topped with a good quality top coat, the cat eye effect can last anywhere from one to three weeks. To extend its wear, it’s advisable to avoid harsh chemicals and wear gloves when doing chores.
Can I achieve the cat eye effect with regular nail polish?
Regular nail polish typically does not contain the magnetic particles needed to create the cat eye effect. However, there are some special magnetic nail polishes available that can mimic the cat eye look without the need for gel application. If you want the traditional cat eye effect, using a gel polish with a magnet is the most effective method. If you prefer a simpler approach, look for magnetic nail polishes designed for that purpose.
Video:
First, ensure your surface is clean and dry. A well-prepared canvas will yield the best results. Apply a base coat to protect your nails, allowing it to dry completely before moving on.
Next, grab the special lacquer with magnetic properties. Apply a generous layer, making sure to cover every part of the nail. This is where the magic begins, so don’t hold back!
Now comes the exciting part. While the polish is still wet, quickly bring your tool close to the nail. Hold it just above the lacquer–about 1 to 2 millimeters away. This distance is crucial for achieving the desired effect. Wait for about 10 to 15 seconds to let the pattern form before curing the polish under a UV lamp.
Once cured, finish with a top coat to seal the design and add shine. This step not only enhances the look but also ensures durability, keeping your claws fabulous for longer!
Finally, admire your work! The unique patterns created by the magnet will have everyone asking how you achieved such a stunning look. You’ll be the talk of the town, and I can guarantee that your friends will be impressed!
Application Technique for Magnetic Nail Coating
Position the tool above the coated surface, maintaining a distance of about 1-2 millimeters. Hold it steady for 10-15 seconds. This allows the shimmering particles to align and create that mesmerizing effect. Ensure that the nail is fully cured before this step for the best outcome.
Final Touches
After achieving the desired look, seal everything with a top coat. This not only enhances the brilliance but also extends the durability of the finish. Make sure to cap the free edge for added protection. Allow sufficient time for drying to preserve the stunning design you’ve created.
Choosing the Right Magnet for Your Polish
Selecting the ideal tool can significantly impact the outcome of your manicure. Here are some specific options to consider:
- Flat Magnets: These are excellent for achieving a subtle, linear effect. The flat surface allows for even distribution of the metallic particles in the lacquer.
- Wave Magnets: Perfect for creating a swirling design. This type adds depth and dimension to your nails, giving a unique look.
- Circular Magnets: Useful for a more concentrated and bold appearance. The round shape can create a striking cat-eye effect when held at the right angle.
- Custom Magnets: Consider investing in specialized tools that come with unique patterns. These can introduce creativity and personal flair to your style.
Experimenting with different types will help you understand what works best for your desired look. Always remember to check the strength of the magnet; stronger options yield more pronounced effects.
Before starting, ensure the polish is applied evenly and has the right consistency. A thicker consistency often yields better results with magnet interaction.
Finally, practice makes perfect! Don’t hesitate to try various techniques to find the style that suits you best.
Step-by-Step Application Process for Cat Eye Effect
To achieve that mesmerizing feline-inspired finish, follow these precise steps. Begin with a clean surface; ensure nails are prepped and polished with a base coat. This prevents staining and promotes adherence.
Layering the Color
Apply the chosen shade evenly, allowing it to dry partially. A thin coat is ideal, as it provides a better reaction with the subsequent steps.
Creating the Cat Eye Look
Once the initial layer is somewhat dry, position the tool above the nail, about 1-2 centimeters away. Hold it steady for approximately 10-15 seconds. The magnetic particles will shift, creating that captivating optical illusion. Afterward, finish with a top coat to seal the design and enhance its shine.
During this process, ensure that all tools are sanitized, and if you’re curious about your feline’s diet, check out if can cats eat cranberry sauce. Also, be mindful of the storage practices for your kitty’s meals; find out whether does canned cat food have to be refrigerated after opening.
FAQ:
What is the process of using a magnet for cat eye polish?
Using a magnet for cat eye polish involves a few key steps. First, apply a base coat and let it dry completely. Then, apply a layer of cat eye gel polish and cure it under a UV or LED lamp. After that, take the magnet and hold it close to the nail (but not touching) for about 10-15 seconds. This will cause the metallic particles in the polish to move and create the desired cat eye effect. Finally, cure the nail again and apply a top coat to seal the design.
Can I use any type of magnet for cat eye polish?
Not all magnets are suitable for cat eye polish. The best results are achieved with specialized magnets designed for nail art. These magnets usually have specific shapes, such as stripes or circles, to create different effects. However, some people have experimented with household magnets, but the results may vary. For the best outcomes, it’s recommended to use magnets made explicitly for cat eye gel polish.
How long does the cat eye effect last on nails?
The longevity of the cat eye effect on nails depends on several factors, including the quality of the polish used, the application technique, and the wear and tear on the nails. Generally, if applied correctly and topped with a good quality top coat, the cat eye effect can last anywhere from one to three weeks. To extend its wear, it’s advisable to avoid harsh chemicals and wear gloves when doing chores.
Can I achieve the cat eye effect with regular nail polish?
Regular nail polish typically does not contain the magnetic particles needed to create the cat eye effect. However, there are some special magnetic nail polishes available that can mimic the cat eye look without the need for gel application. If you want the traditional cat eye effect, using a gel polish with a magnet is the most effective method. If you prefer a simpler approach, look for magnetic nail polishes designed for that purpose.


