


For a stunning finish that captures attention, begin with a well-prepared base. Clean your nails thoroughly and buff the surface to ensure a smooth application. A perfect foundation sets the stage for the mesmerizing effect that you’re aiming for.
Choosing the right shade is key. Opt for a color that resonates with your personality, and don’t hesitate to experiment with different hues. The magic happens when you apply a thin layer of the chosen formula, ensuring even coverage. A light touch prevents bubbling and ensures a flawless look.
After applying the initial coat, it’s time to activate the captivating shimmer. Use a small magnet to draw the metallic particles within the coating, creating that iconic feline allure. Hold the magnet close to the nail without touching it, and watch as the color shifts and transforms.
Finish with a top coat to seal in the beauty and add extra shine. Allow adequate curing time under a UV or LED lamp to achieve durability. Proper care will keep your manicure looking fabulous for days, making it a purrfect choice for any occasion.
Application Tips for Cat-Themed Nail Lacquer
Before starting, ensure your claws are clean and dry. A base coat provides a solid foundation and enhances adherence. Apply a thin layer, curing it under a UV or LED lamp for the recommended time.
Color Application
For the main hue, carefully apply a thin coat, making sure to cover the entire surface. Curing is essential after each layer, typically around 30 seconds to 1 minute based on your light source. Repeat the process for a second coat to achieve depth and intensity.
Magnetic Effect
To create that mesmerizing shifting effect, immediately after applying the final layer but before curing, use a magnet tool to draw the metallic particles. Hold it above the nail for about 10 seconds. Cure again to set the design. Finish with a top coat for a glossy finish, sealing in the artistry.
Preparing Your Nails for Cat Eye Gel Application
Ensure that your claws are clean and free from any old lacquer. Use a gentle remover to eliminate remnants, as this sets the stage for a flawless finish.
Next, file your nails to your desired shape. A smooth edge prevents snagging and makes the application process smoother. Buff the surface lightly to remove shine; this helps the new coating adhere better.
Don’t forget to push back your cuticles gently. This not only creates a neat appearance but also allows for better coverage of the base. If you have any hangnails, carefully trim them to avoid any interference during the application.
Apply a base layer specifically designed for this type of finish. This promotes durability and enhances the overall look. Let it cure under a UV or LED lamp as per the product instructions.
Stay aware of the products you use. Some ingredients can be harmful. For example, learn about safety concerns regarding various substances, like is geraniol safe for cats, to keep your environment safe.
Following these steps will ensure that your claws are perfectly prepped for the application, leading to stunning results every time.
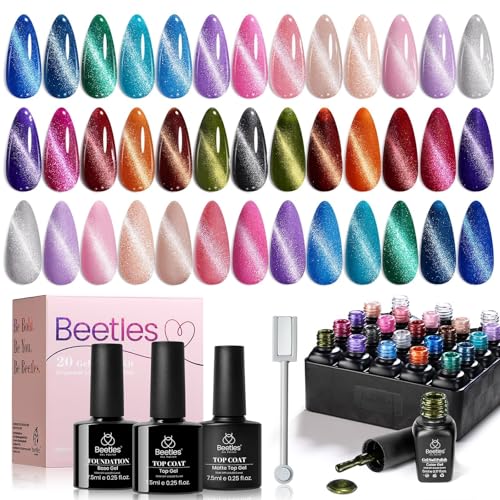
Applying DND Cat Eye Gel Polish for Optimal Results
Choose a premium base coat to start. Apply it evenly and cure under an LED lamp for the recommended time. This ensures a solid foundation for the color application.
Pick your desired shade from the range of mesmerizing hues. With the brush, apply a thin layer of the polish, ensuring full coverage of the nail. Avoid touching the skin to prevent lifting.
After the first layer is cured, apply a second coat. At this stage, take a magnet and hold it above the nail for a few seconds to create that captivating cat-eye effect. Experiment with different angles to see how the shimmer shifts.
Once satisfied with the design, cure the final layer. Apply a top coat to seal the look, providing protection and enhancing shine. Cure this layer again for a glossy finish.
Finish by cleansing the nails with a lint-free wipe and cleanser to remove any sticky residue. This step will leave your nails looking polished and brilliant.
Removing Cat Eye Gel Polish Safely and Properly
Start by gathering materials: acetone, cotton balls, aluminum foil, and a wooden stick. This makes the process smoother.
- Soak a cotton ball in acetone. Make sure it’s saturated but not dripping.
- Place the soaked cotton ball on the nail. Wrap it with aluminum foil to keep it in place. This helps the product dissolve.
- Wait for about 10-15 minutes. This allows the solution to penetrate and break down the finish.
- Gently remove the foil and cotton ball. If the coating doesn’t come off easily, reapply the cotton and foil, then wait a few more minutes.
- Use the wooden stick to gently scrape off any remaining residue. Be cautious to avoid damaging the nail bed.
- Wash your hands thoroughly to remove any acetone residue.
- Moisturize your nails and cuticles with a nourishing oil or cream to restore hydration.
Regularly practicing this method ensures that your nails stay healthy and beautiful, even after multiple applications.
For a stunning finish that captures attention, begin with a well-prepared base. Clean your nails thoroughly and buff the surface to ensure a smooth application. A perfect foundation sets the stage for the mesmerizing effect that you’re aiming for.
Choosing the right shade is key. Opt for a color that resonates with your personality, and don’t hesitate to experiment with different hues. The magic happens when you apply a thin layer of the chosen formula, ensuring even coverage. A light touch prevents bubbling and ensures a flawless look.
After applying the initial coat, it’s time to activate the captivating shimmer. Use a small magnet to draw the metallic particles within the coating, creating that iconic feline allure. Hold the magnet close to the nail without touching it, and watch as the color shifts and transforms.
Finish with a top coat to seal in the beauty and add extra shine. Allow adequate curing time under a UV or LED lamp to achieve durability. Proper care will keep your manicure looking fabulous for days, making it a purrfect choice for any occasion.
Application Tips for Cat-Themed Nail Lacquer
Before starting, ensure your claws are clean and dry. A base coat provides a solid foundation and enhances adherence. Apply a thin layer, curing it under a UV or LED lamp for the recommended time.
Color Application
For the main hue, carefully apply a thin coat, making sure to cover the entire surface. Curing is essential after each layer, typically around 30 seconds to 1 minute based on your light source. Repeat the process for a second coat to achieve depth and intensity.
Magnetic Effect
To create that mesmerizing shifting effect, immediately after applying the final layer but before curing, use a magnet tool to draw the metallic particles. Hold it above the nail for about 10 seconds. Cure again to set the design. Finish with a top coat for a glossy finish, sealing in the artistry.
Preparing Your Nails for Cat Eye Gel Application
Ensure that your claws are clean and free from any old lacquer. Use a gentle remover to eliminate remnants, as this sets the stage for a flawless finish.
Next, file your nails to your desired shape. A smooth edge prevents snagging and makes the application process smoother. Buff the surface lightly to remove shine; this helps the new coating adhere better.
Don’t forget to push back your cuticles gently. This not only creates a neat appearance but also allows for better coverage of the base. If you have any hangnails, carefully trim them to avoid any interference during the application.
Apply a base layer specifically designed for this type of finish. This promotes durability and enhances the overall look. Let it cure under a UV or LED lamp as per the product instructions.
Stay aware of the products you use. Some ingredients can be harmful. For example, learn about safety concerns regarding various substances, like is geraniol safe for cats, to keep your environment safe.
Following these steps will ensure that your claws are perfectly prepped for the application, leading to stunning results every time.
Applying DND Cat Eye Gel Polish for Optimal Results
Choose a premium base coat to start. Apply it evenly and cure under an LED lamp for the recommended time. This ensures a solid foundation for the color application.
Pick your desired shade from the range of mesmerizing hues. With the brush, apply a thin layer of the polish, ensuring full coverage of the nail. Avoid touching the skin to prevent lifting.
After the first layer is cured, apply a second coat. At this stage, take a magnet and hold it above the nail for a few seconds to create that captivating cat-eye effect. Experiment with different angles to see how the shimmer shifts.
Once satisfied with the design, cure the final layer. Apply a top coat to seal the look, providing protection and enhancing shine. Cure this layer again for a glossy finish.
Finish by cleansing the nails with a lint-free wipe and cleanser to remove any sticky residue. This step will leave your nails looking polished and brilliant.
Removing Cat Eye Gel Polish Safely and Properly
Start by gathering materials: acetone, cotton balls, aluminum foil, and a wooden stick. This makes the process smoother.
- Soak a cotton ball in acetone. Make sure it’s saturated but not dripping.
- Place the soaked cotton ball on the nail. Wrap it with aluminum foil to keep it in place. This helps the product dissolve.
- Wait for about 10-15 minutes. This allows the solution to penetrate and break down the finish.
- Gently remove the foil and cotton ball. If the coating doesn’t come off easily, reapply the cotton and foil, then wait a few more minutes.
- Use the wooden stick to gently scrape off any remaining residue. Be cautious to avoid damaging the nail bed.
- Wash your hands thoroughly to remove any acetone residue.
- Moisturize your nails and cuticles with a nourishing oil or cream to restore hydration.
Regularly practicing this method ensures that your nails stay healthy and beautiful, even after multiple applications.


